🔎 New Comparison: We analyzed the pricing, commercial rights, and features of the top 7 platforms. Before you buy, read our Ultimate AI Voice Guide.
Table of Contents
Let’s be honest: “Death by PowerPoint” is a real phenomenon. Nothing puts an audience to sleep faster than reading walls of text in silence. Whether you are creating a university lecture or a quarterly business update, adding a voice over with PowerPoint transforms a static deck into an engaging story.
But for many creators, the actual process of adding narration is the most stressful part of the workflow.
You probably know the scenario: You close the windows to block out street noise. You set up your microphone, but you can still hear your laptop fan whirring in the background. You stumble over a word in the final sentence and have to re-record the entire slide for the tenth time. It is frustrating, exhausting, and time-consuming.
The good news is that in 2025, you have options. In this complete guide, I will walk you through exactly how to add audio to PowerPoint using two distinct methods:
- The Traditional Method (Native): How to use PowerPoint’s built-in recording features (best if you already have a high-quality microphone and a confident speaking voice).
- The Professional Method (AI): How to generate flawless, studio-quality narration using AI tools (best for those who want a polished result without buying expensive gear).
Why trust this guide? As someone who has created hundreds of training presentations and e-learning modules, I know that simply “inserting audio” is only half the battle. The biggest technical mistake that ruins a presentation is poor synchronization between audio and animations. In this guide, I won’t just show you which buttons to click; I will show you how to avoid the common pitfalls that make presentations look amateur.
Let’s get started.
Method 1: Using AI Text-to-Speech (The Professional Way)
This is the modern standard for business presentations, e-learning modules, and YouTube tutorials.
Why are professionals switching from microphones to AI? The answer is consistency. When you record your own voice, you have to worry about background noise (traffic, computer fans), room echo, and your own vocal fatigue.
Some creators go a step further and use Voice Cloning to keep their personal brand whilst enjoying the speed of AI generation. If you want to narrate with your own voice but without the microphone hassle, read my guide on How to Clone Your Voice with AI.
With AI tools, you get:
- Zero Background Noise: Studio-quality silence behind every word.
- Perfect Diction: No “umms,” “ahhs,” or stuttering.
- Easy Updates: If you need to change one sentence next month, you don’t need to set up your microphone and try to match the tone of the original recording. You simply edit the text and click “Generate.”
- Compared to the cost of a traditional recording studio, a subscription to Murf AI (Check Pricing Here) pays for itself after creating just one professional video.
Microphone vs AI Comparison
Here is how to do it step-by-step.
Step 1: Choose Your Tool
Not all text-to-speech engines are created equal. For a presentation, you need a voice that sounds authoritative yet engaging—not robotic.
- ElevenLabs: Currently offers the most realistic human voices on the market (I recommend the “Adam” or “Rachel” pre-made voices for general narration).
- Murf AI: Designed specifically for corporate presentations and e-learning. It even has integrations for Google Slides and Canva.
- Recommendation: If you are unsure which one fits your workflow, check my Murf AI review specifically for presentation work to see how it handles syncing features.
For this guide, I will be using Murf AI.
Step 2: Generate Your Audio Files
Once you have created your Murf account (you can start with the free trial), the process is straightforward:
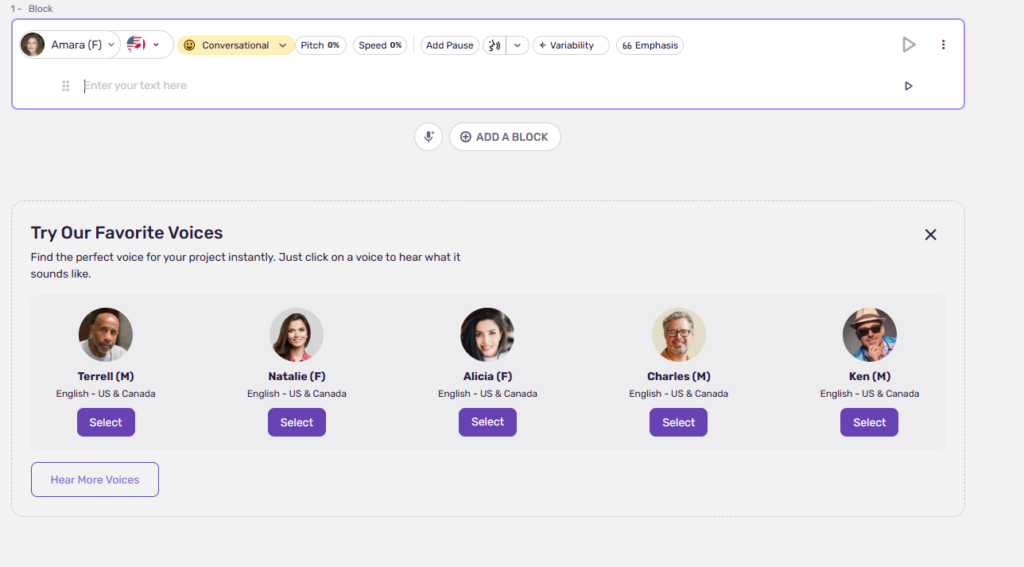
- Create a Project: Open the Murf Studio dashboard and start a new project.
- Paste your text: Copy the narration text for your first slide into the text block.
- Select a Voice: Choose an Avatar that fits the tone of your presentation (e.g., “Ken” for professional corporate, or “Amara” for soft e-learning).
- Generate & Download: Click the play button to build the audio, then click Export to download the file as an MP3 or WAV.
💡 Pro Tip: The “One Slide, One File” Rule Do not generate one massive audio file for the entire 20-minute presentation. It will be a nightmare to synchronize later. Instead, generate a separate audio file for each slide. Name them clearly to stay organized, for example:
Slide1_Intro.mp3,Slide2_Q3Results.mp3,Slide3_Conclusion.mp3.
Step 3: Import Audio into PowerPoint
Now that you have your crystal-clear audio files, it is time to put them into the deck.
- Open your PowerPoint presentation and navigate to the specific slide you want to narrate.
- Go to the Insert tab on the top ribbon.
- On the far right, click on the Media dropdown (or just Audio depending on your version).

- Select Audio on My PC…
- Browse your computer for the specific file (e.g.,
Slide1_Intro.mp3) and click Insert.
You will now see a speaker icon appear on your slide. In the next sections, I will show you how to hide that icon so your audience never sees it.
Method 2: Recording Your Own Voice (The Native Way)
If you have a professional voice and the right equipment, you don’t need AI. PowerPoint has a built-in recorder that works surprisingly well for quick narrations.
However, before you hit the record button, you must meet the hardware requirements. Do not try to do this with your laptop’s built-in microphone. The audio will sound tinny, distant, and full of echo.
The Minimum Setup:
- External USB Microphone: (e.g., Blue Yeti or similar).
- A Quiet Environment: A small room with carpets or curtains to dampen the echo.
Step-by-Step Recording Guide
If your setup is ready, here is how to record directly inside the application:
- Select Your Slide: Open PowerPoint and click on the specific slide you want to narrate.
- Open the Recorder: Go to the Insert tab, click the Audio dropdown on the far right, and select Record Audio…
- Name Your Clip: A small window will pop up.
- Crucial Step: By default, it will be named “Recorded Sound 1”. Change this to something descriptive like “Slide 5 – Sales Data”. This makes it much easier to manage animations later.
- Start Recording: Click the Red Dot button to begin.
- Speak Clearly: Deliver your lines. Wait a second after you finish speaking before you stop (to avoid cutting off the last word).
- Stop & Save: Click the Square (Stop) button when finished. Click OK to insert the audio object onto the slide.
⚠️ The Major Downside: No “Undo” Button for Voice The biggest frustration with this method is the lack of editing. If you stutter, sneeze, or mispronounce a word in the middle of a paragraph, you cannot edit just that word. You have to delete the entire clip and record the whole slide again from the beginning.
This is where the AI method (Method 1) wins—correcting a mistake there takes 5 seconds of typing.
Advanced Settings: Syncing & Playback
By now, you have successfully inserted an audio file onto your slide, whether it was generated by Murf AI or recorded yourself.
But right now, it’s not a seamless experience. You have a large, ugly speaker icon sitting in the middle of your content, and—even worse—you have to manually click that icon during the presentation to start the audio.
Let’s fix that and make your presentation look professional.
Note: The settings below are located in the Playback tab, which only appears on the top ribbon after you click to select the speaker icon on your slide.
How to Play Audio Automatically
By default, PowerPoint sets audio to play “In Click Sequence.” This means the narration won’t start until you click the mouse or hit the spacebar. For a smooth presentation, you want the voiceover to start the moment the slide appears.
- Click the speaker icon on your slide to select it.
- Navigate to the Playback tab on the ribbon.
- In the “Audio Options” group, locate the Start: dropdown menu.
- Change the setting from “In Click Sequence” to Automatically.

How to Hide the Speaker Icon
Nothing ruins the aesthetics of a carefully designed slide like a gray speaker icon sitting on top of your graphics. You need it there while editing, but your audience should never see it.
- Select the speaker icon.
- Go to the Playback tab.
- In the “Audio Options” group, check the box marked Hide During Show.
Now, the icon will be visible in edit mode but will completely disappear when you enter presentation mode (F5).

Play Across Slides (Background Music)
If you are adding a voiceover, you usually want it to stop when you move to the next slide.
However, if you want to add subtle background music that sets a mood and continues uninterrupted while you click through different slides, you need a special setting. Otherwise, the music will abruptly cut off at every slide transition.
- Insert your music file on the first slide where you want it to begin.
- Select the music icon and go to the Playback tab.
- PowerPoint has a one-click shortcut for this: Click the Play in Background button in the ribbon.
This automatically checks “Play Across Slides,” “Loop until Stopped,” and “Hide During Show,” ensuring smooth, continuous background audio.
⚠️ Crucial Tip: Watch Your Volume If you use background music alongside a voiceover, you must lower the music volume significantly. Select the music icon, go to the Playback tab, click Volume, and set it to Low. Your narration must always be the dominant sound.

Pro Tips for Better Presentations
You now know the mechanics of inserting audio. But to make your presentation feel like a high-end documentary rather than a high school project, you need to pay attention to the details.
Here are three professional tips I use for every deck I create.
Best File Formats: WAV vs. MP3
Quality matters. If you play your presentation in a large conference room or over a Zoom call, low-quality audio will sound “crunchy” and distorted.
- Avoid: Low-quality MP3s (128kbps or lower). They sound underwater.
- Recommended: If your AI tool (like Murf AI or ElevenLabs) allows it, always download your files in .WAV format. It is uncompressed and offers the highest fidelity.
- Alternative: If you must use MP3 to save file space, ensure it is at least 192kbps or 320kbps.
Volume Balancing: Voice is King
A common mistake beginners make is letting background music overpower the narration.
The rule of thumb for mixing is simple: Narration should be at 100% volume, and background music should be at 15-20%.
If you are generating your voiceover with AI, the volume levels are usually perfectly normalized (loud and clear). If you add background music via PowerPoint, remember to select the music icon, go to Playback > Volume, and strictly set it to Low. If the music makes the audience strain to hear the words, it is a distraction, not an enhancement.
Syncing Animations with Voice (The “Magic” Trick)
The mark of a true pro is when a bullet point appears on the screen exactly as the narrator speaks that point.
You don’t need to split your audio into tiny chunks to do this. You can do it using the Animation Pane.
- Insert your full audio for the slide and set it to “Start: Automatically.”
- Apply animations to your text (e.g., “Fade In”).
- Go to the Animations tab and click Animation Pane.
- In the pane, you will see your audio file and your text animations.
- Right-click your text animation and select Start With Previous.
- Now, the magic happens in the Delay box. Listen to your audio, note the exact second the narrator starts the second sentence (e.g., at 04.50 seconds), and enter that time into the Delay field for that specific text animation.
It takes a little trial and error, but the result is a perfectly synchronized, broadcast-quality slide.

For business presentations, you need a voice that is consistent and stable. You can achieve this by tweaking the ‘Stability’ sliders in the settings menu. Learn the exact settings for a professional corporate tone in our guide: How to Use ElevenLabs.
Troubleshooting Common Audio Issues
You have finished your presentation, it sounds great on your laptop, but then disaster strikes: you send it to your boss or try to play it on a conference room PC, and there is dead silence.
Here is how to fix the two most common “voice over with powerpoint” nightmares so you don’t have to search Google in a panic.
Problem 1: “My Audio Won’t Play on Another Computer”
The Cause: In older versions of PowerPoint (and sometimes new ones), audio files were “linked” rather than “embedded.” This means PowerPoint remembers the path to the file on your computer (e.g., C:/Users/You/Desktop/audio.mp3). When you move the file to another PC, that link breaks.
The Fix: Package the Presentation Don’t just email the .pptx file. Use the packaging feature to bundle all audio and video files together.
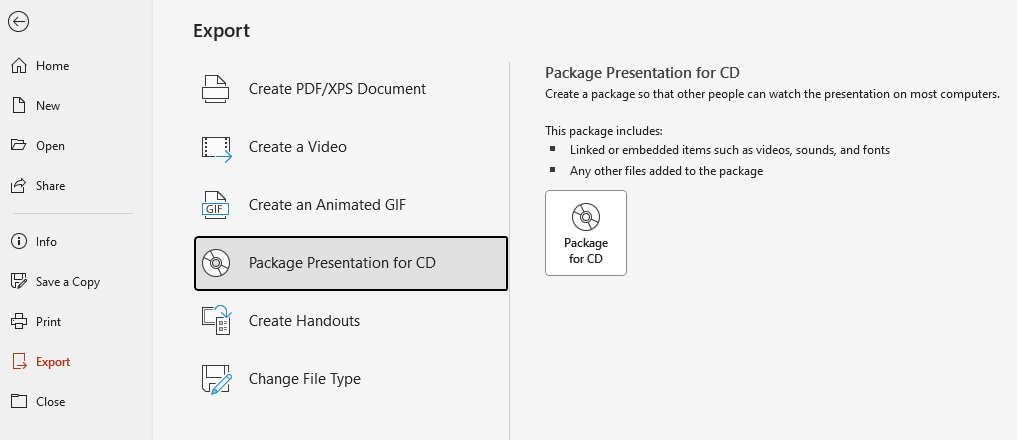
- Go to File > Export.
- Select Package Presentation for CD (don’t worry, you don’t need an actual CD).
- Click Package for CD, name your folder, and click Copy to Folder. This creates a folder containing your presentation and all your audio files safely stored inside. You can zip this folder and send it anywhere.
Problem 2: “My PowerPoint File is Too Huge to Email”
The Cause: High-quality WAV files are heavy. A 20-slide presentation with voiceover can easily exceed 100MB, which is too big for most email attachments.
The Fix: Use Built-in Compression PowerPoint has a hidden tool to shrink media file sizes without ruining the quality.
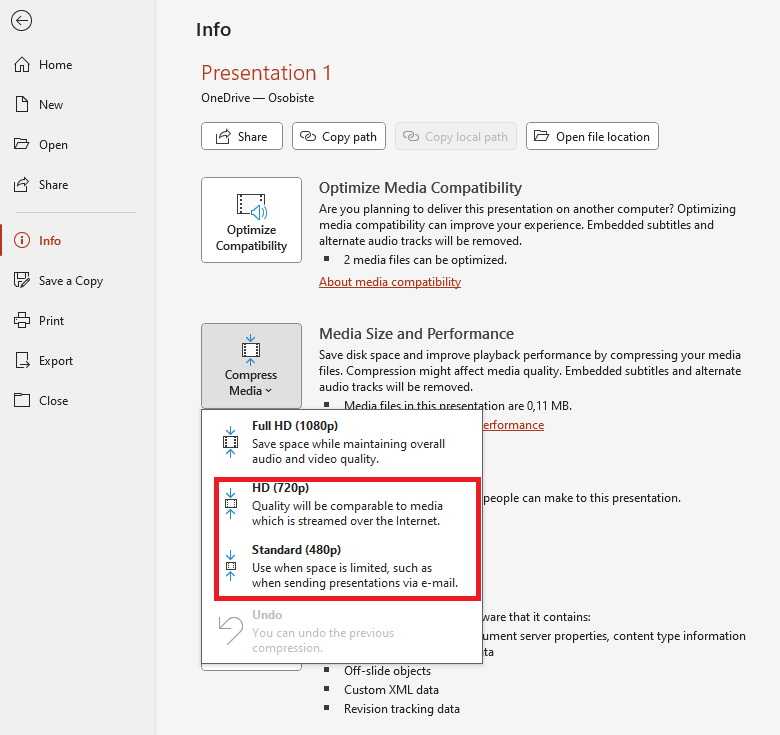
- Go to File > Info.
- Click on the Compress Media button.
- Select Standard (480p) or HD (720p). PowerPoint will scan all your audio clips and compress them. I often see file sizes drop from 150MB to 15MB in seconds.
Summary: Which Method Should You Choose?
Adding a voice over to PowerPoint is the single best way to make your content accessible and engaging. But should you use your own voice or an AI tool?
Here is a quick comparison to help you decide:
| Feature | Method 1: AI Voice Over (Murf/ElevenLabs) | Method 2: Manual Recording (Microphone) |
| Audio Quality | Studio Quality (Consistent) | Variable (Depends on room & mic) |
| Equipment Needed | None (Just a laptop) | High-quality USB Microphone |
| Time Investment | Low (Type & Click) | High (Re-recording mistakes) |
| Edits | Easy (Edit text & regenerate) | Hard (Must re-record entire clip) |
| Cost | Paid Subscription | Free (if you have the gear) |
| Best For… | Professional/Corporate Presentations | Quick internal updates / Personal stories |
Final Verdict
If you are recording a quick update for your team and you are confident in your speaking voice, the built-in recorder is fine.
However, if you are creating client-facing decks, e-learning courses, or YouTube videos, audio quality is non-negotiable. Bad audio makes you look unprofessional.
If you want to sell your course to a global audience, clarity is key. Interestingly, many non-native English speakers find a clear UK pronunciation easier to understand. You can easily convert your scripts using British Accent Text to Speech software to give your lessons a professional, academic feel.
Before you create your slides, you need to digest the source material. If your research is locked in long PDF reports, save your eyes and listen to them instead. Here is a workflow to use a PDF to Sound Converter to consume your research 2x faster
Stop wasting hours recording take after take.
If you want to save time and sound like a pro immediately, I recommend using a dedicated AI tool. It handles the clarity, pacing, and tone for you.
- For Corporate/E-Learning Focus: Try Murf AI for Free Here – It has the best workflow for slides.
- For Maximum Realism: Try ElevenLabs Here – The voices are indistinguishable from humans.
Good luck with your presentation!
Transparency Note: This post contains affiliate links. If you use these links to buy something, I may earn a commission at no extra cost to you. Thanks for your support!